For this build, I will be making the iconic Sandcrawler from Star Wars. The base kit is from Randy Cooper who produces a 1/96 scale resin model that measures about 26″ long by 12.5″ tall. This kit will run you around $500 with shipping. I was lucky and found one on sale. It is a big, heavy model. For reference photos, do a search for Sandcrawler Studio Model Photos from Alan Anderson. Alan Anderson has provided a wonderful set of detail photos of the studio Sandcrawler model that I will use throughout this build. All studio photo credit goes to Alan. I will also reference the movie Star Wars and some printed material such as the Incredible Cross-Sections of Star Wars: The Ultimate Guide to Star Wars Vehicles and Spacecraft.
My goal is to recreate the ‘sale of the droids’ scene from Star Wars, so I will be displaying the Sandcrawler with the front ramp down. This means I will cut the ramp from the kit. Scratch built and Micro Machine figures will also be used.
I will not be lighting the kit, although many that build this kit do. Lighting can certainly be installed rather easily, but since the diorama will depict a daytime scene there is no reason. Also, how many times do you really display a model with the lights on? It looks nice, but I rarely fool with lights.
Here is the kit from the box, and the raw pieces laid out. There is also a CD with instructions, but much of the build will have to be figured out on my own.


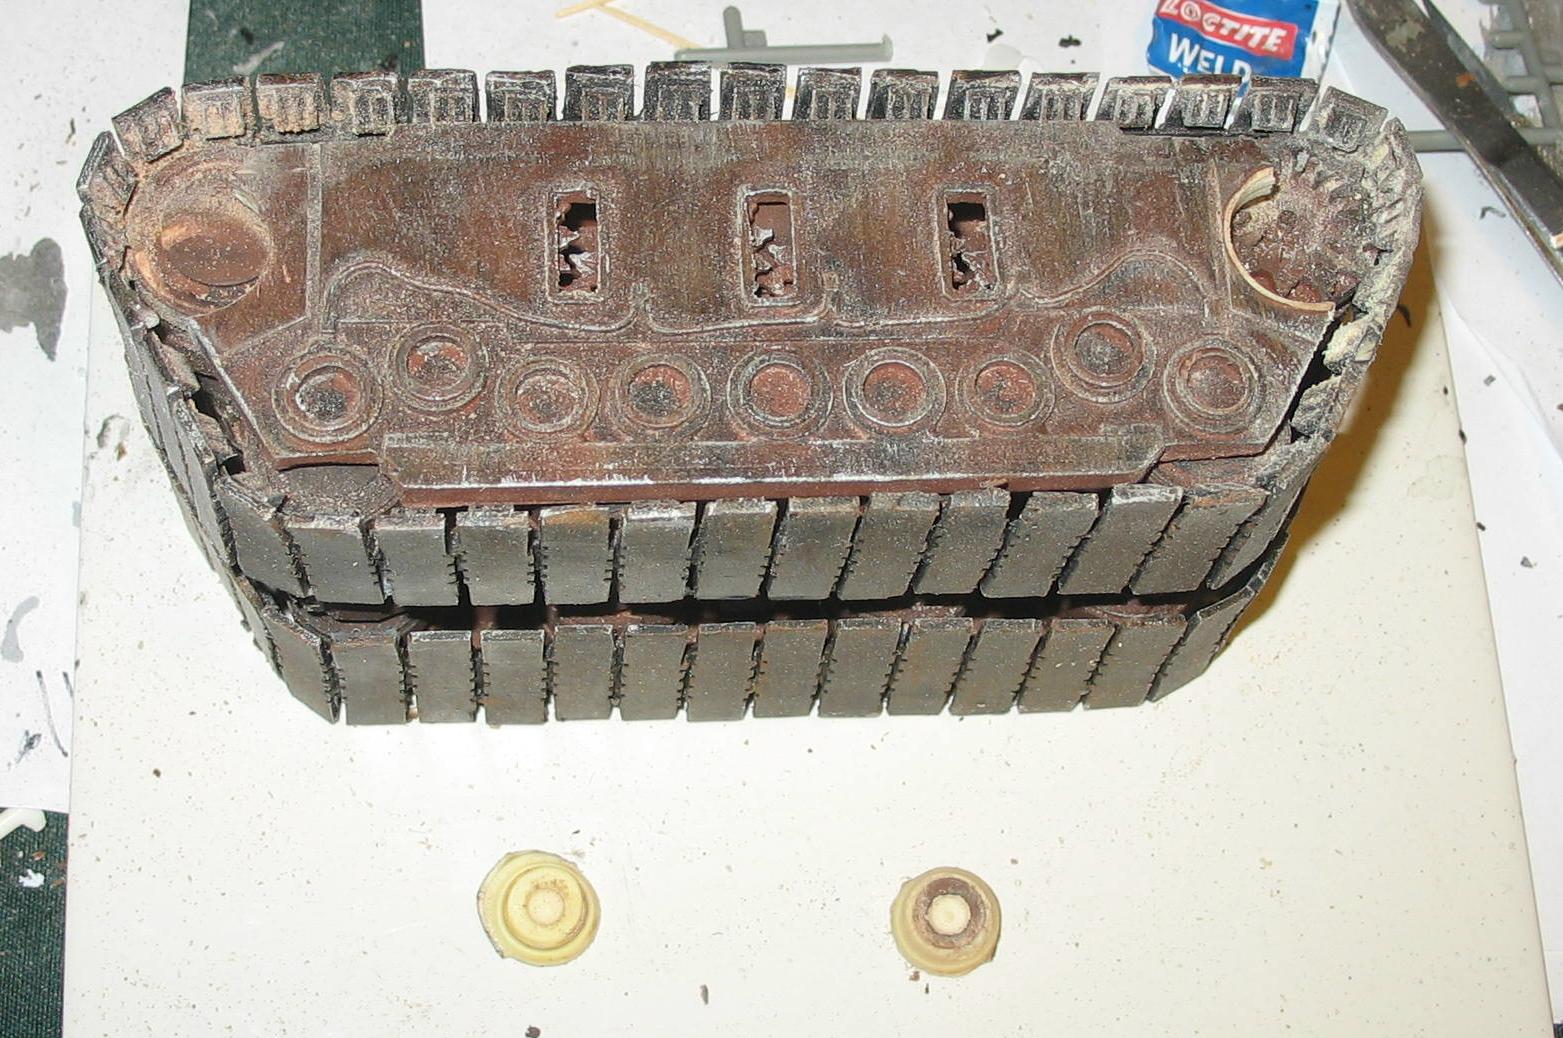
Let us begin with the major clean up, the treads. I used a Dremel cutting wheel and removed the outside flash. The inside flash then broke away easily. You will have to then floss between each of the teeth with the Dremel.

Here are the treads pretty well cleaned up. There is still some little trimming to be done and a couple teeth to be repaired.

I cut the main ramp away from the bow, and it was much more work than I planned. This is thick resin and not the easiest to work with. My whole house had a fog of resin after this was done. Looks like I will be dusting this weekend. Plastic strips were glued to help finish off the edges.

Here are the two rear engine sections being glued together. I used a 2-part epoxy to do the construction.

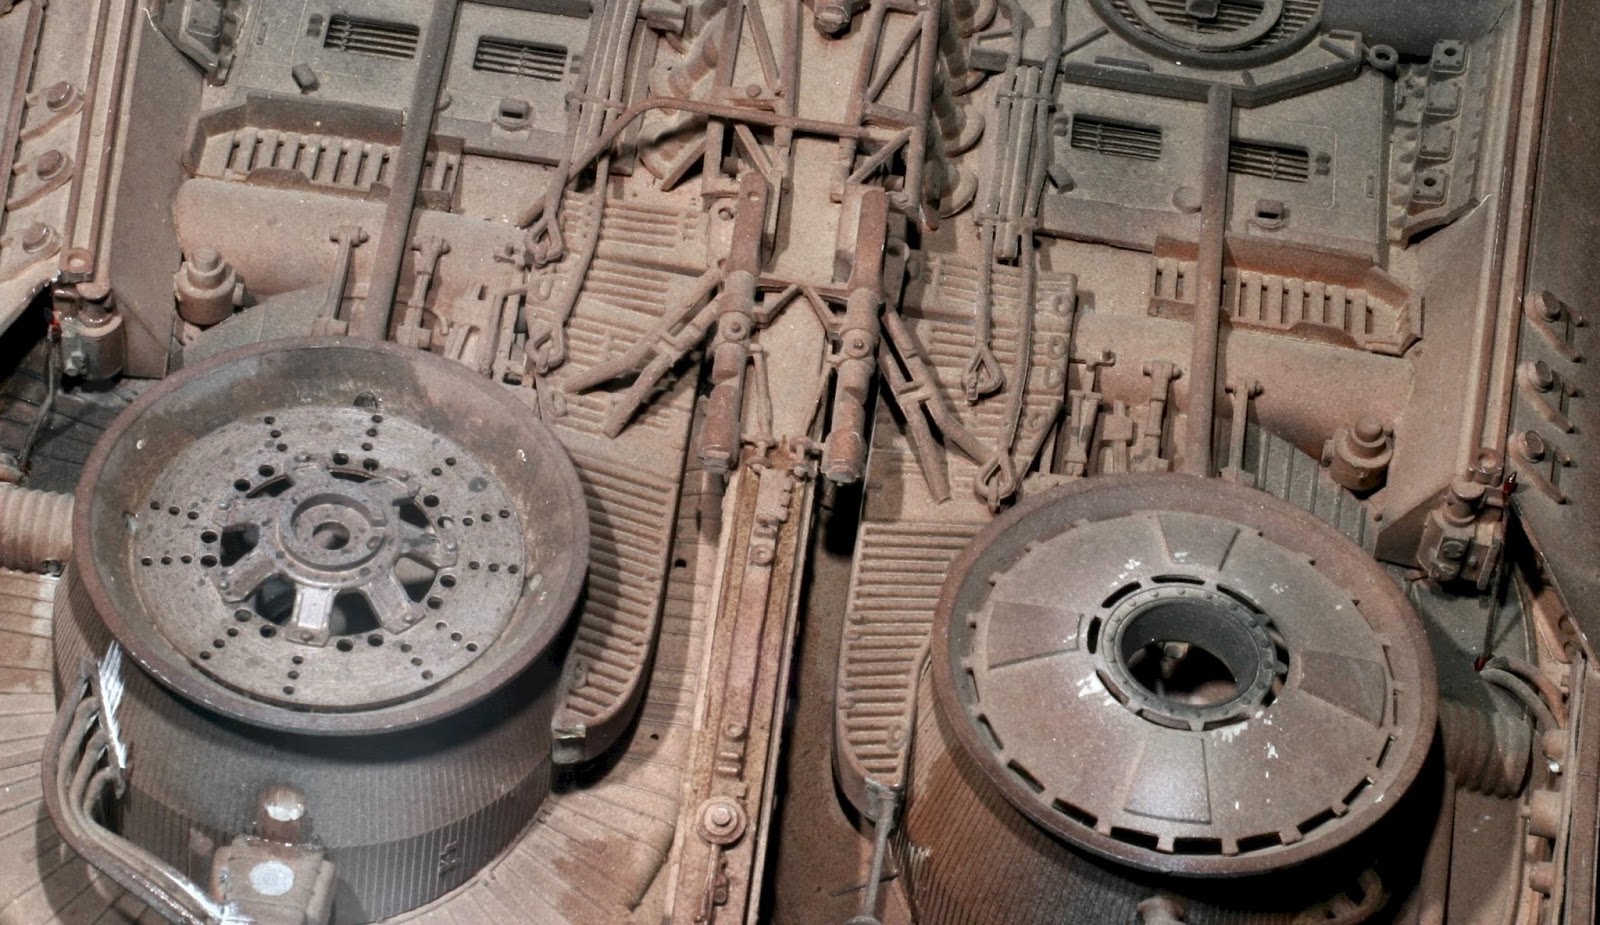
The bridge windows are nicely done, however, to place them on the kit as is would be to have them sticking out. Here is a photo of the studio model showing the windows should be flush.

I grinded a channel in order for the windows to be sunk in and flush with the sides.


Another note on the windows is that the kit has a large space in the center, but the movie prop shows evenly spaced windows. I cut a little piece of resin to split that window.


I was doing some test fitting and realized the sides have this thick flash at the bottom that needs to be removed. I wondered why it wasn't fitting correctly.

Back to the tread assembly. The inside part of the treads come in three pieces, and four of these have to be assembled. So I cleaned up the parts and glued them together.

Attaching the sides to the engine section. One note here, the top cone-like parts of the engine are uniform in the kit. However, on the studio model they should be a little different. I grinded one down and will do a little detailing later to make it match the prop a little better.


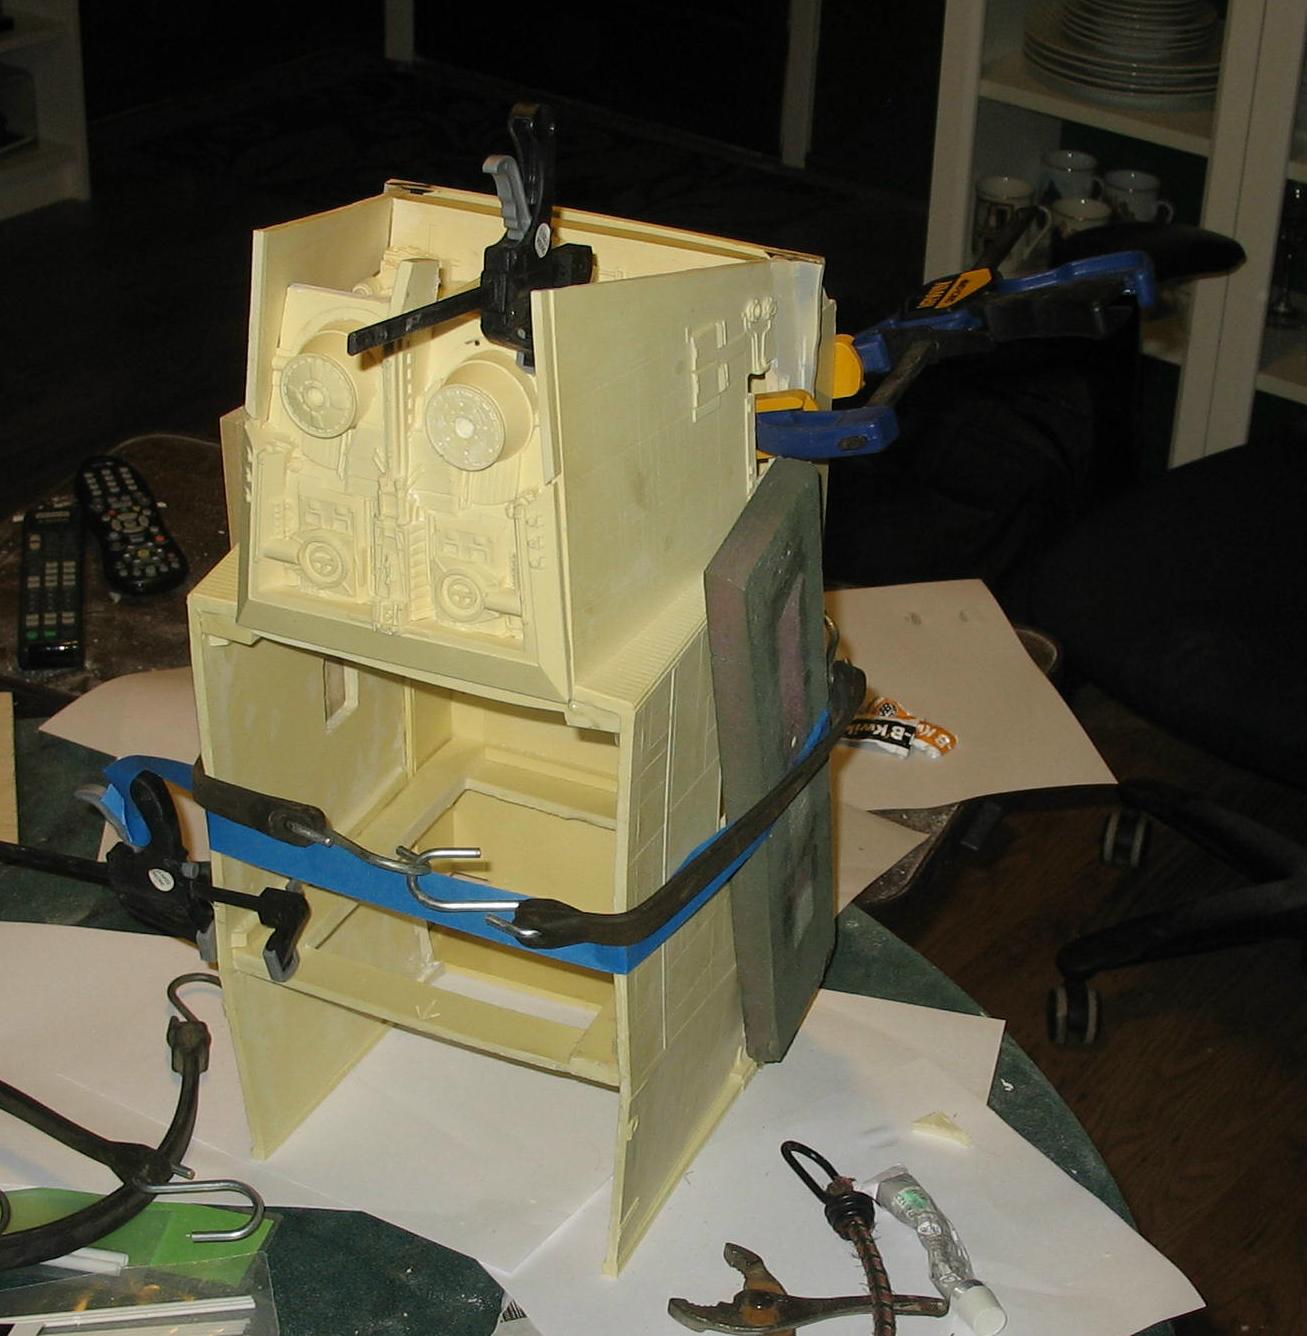
Attaching the bottom of the kit to the sides. As you can see, it requires some creative clamping.
While that was drying, I painted the treads black.

Attaching the front to the main build with more creative clamping.

After it dried, I glued a couple of metal braces to make sure that top part will hold. Everything seems to be holding well so far.

Let us switch gears back to the treads (get it? gears?). It looks like the original prop used parts for a large remote controlled tank with HVSS suspension. I can spot many tank parts throughout the kit. The treads on the prop are powered with a drive sprocket at the front of each tread. The resin kit is the same way. The full size set shows sprockets at both the rear and front of the treads. If you wanted to accurately model after the full size set you would have to modify the resin parts to install these sprockets, but I am going to leave them as they are. Below are some screen caps showing the full size treads.


And the prop treads.

The full size treads also have gears showing through the three spaces between the treads. I am going to include this detail in my build.

These nice, thick resin sections go over the tread wheel assembly. I will do four of these (for the outside pieces).

I grinded away some of the resin.

I found 12 1/35 tank sprockets to use. Good thing I build plenty of Sherman tanks. These will not match the movie sprockets exactly, but they will do. These will be cut in half and glued into place.

And here is what they will look like. Because I grinded down the resin in the back, these will still fit flush on the main assemblies.

I also attached the bottom strips. If I had clamps that actually reached across this would be easier. For those out there building this kit, make sure to get some clamps with at least a 9" reach.

Here I attached the two back plates and bottom section. There was a gap in the back, but the plates cover it well.

I sprayed down these tread sections using this Ultimate Finish Rust-oleum paint. The color is perfect and I won't have to worry about the resin ever rusting.

Test fitting the top shows I glued the engine section a bit too far back, however, the studio model shows there was a notch cut out to make the top fit. So, the fix will mirror the studio prop.


And here we are so far. The top will not be glued on until very late in the build. There are a few gaps that will need filling and some sanding, but it is coming together.

Right now I have been mostly filling seams with putty and sanding, along with doing some general clean up.
The resin model has four of these braces at the font top, but the studio prop has eight in various positions. I decided to make them since resin ones were too difficult to clean up.

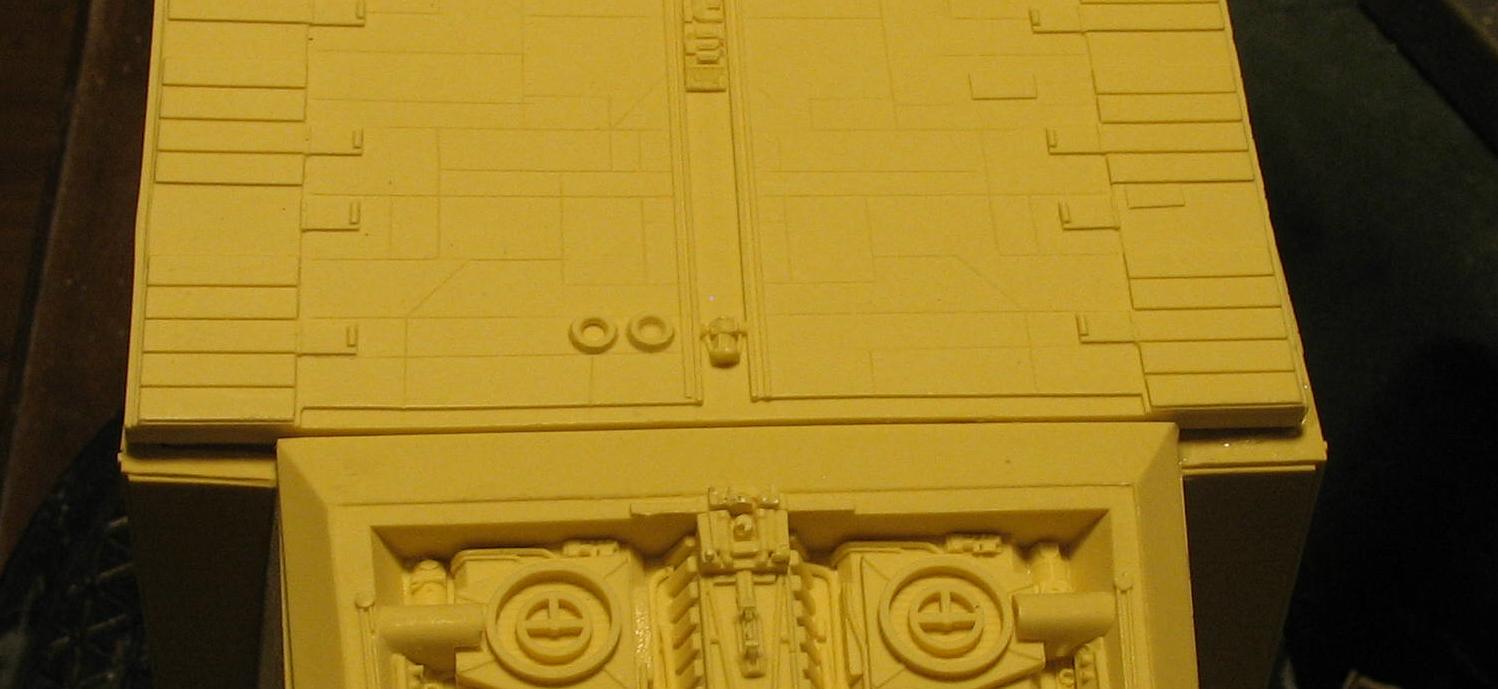
Here I attached the two lower sections to the roof.

And I glued in these panels.

So, I did an f-up. I forgot to install the interior of the lower entrance before gluing the bottom on. Fortunately, I was able to cut a hole in the flooring and get it into place.

Windows are in, just need to do a little clean up on them now.

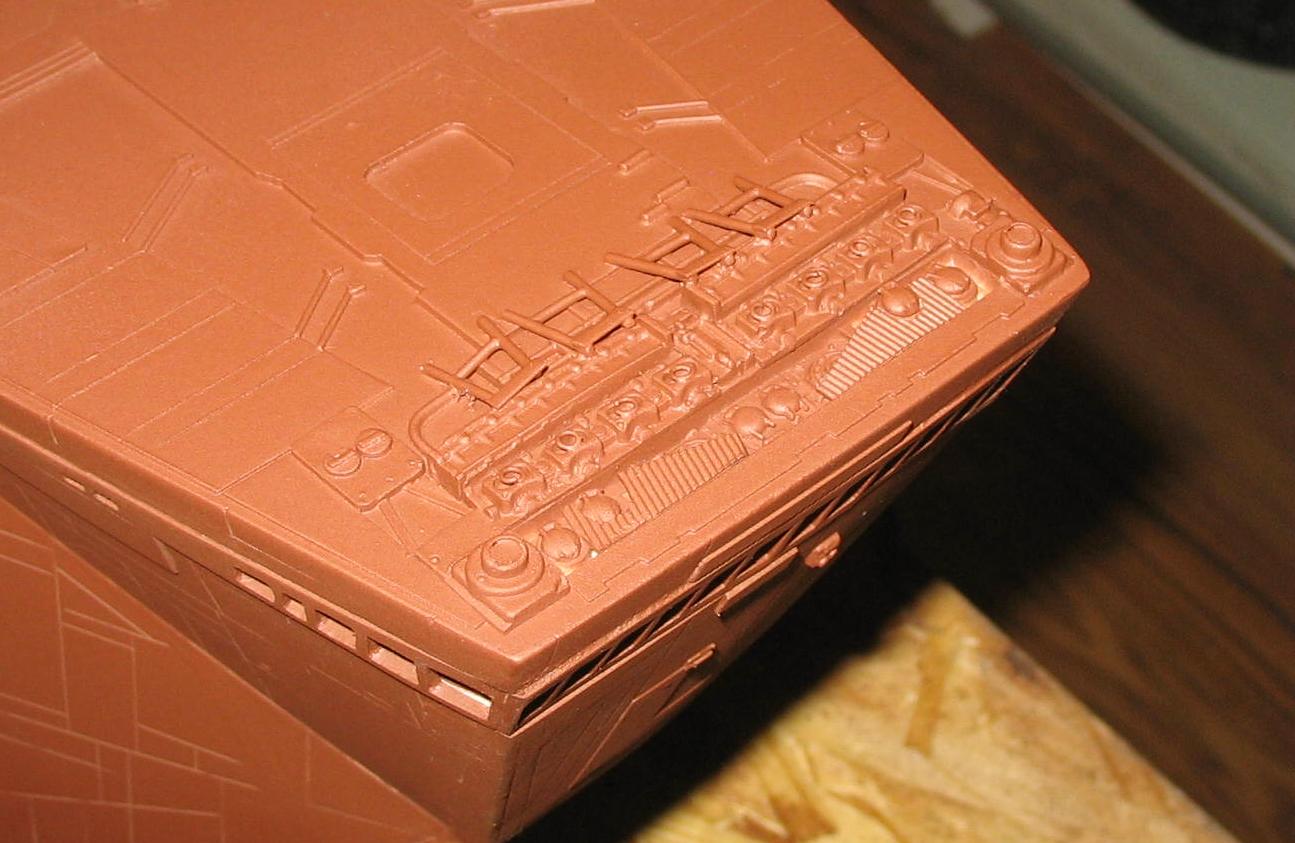
Engine sections are in. I can start detailing sections now. Truthfully, the detailing is really nice. It looks like only little stuff needs to be added, depending on how far you want to go.

Did some detailing on the top of the bridge. Here is the studio model and the resin kit.


Spending the day detailing out the engine and top. The resin detail is nice, I am just adding some little stuff where I can.


Working on the inside and detail, so things are slowing up. Here, I installed the engine recessed parts and added some tubing.

It looks like there is a silver-like color on the inside, so I am using aluminum. I will do some washes and dull coat it so it will not be so shiny.


I scribed some lines in the ramp, which is about ready to paint.

Here I am detailing the inside. Working on the first chamber that we see in the film. It should look like a lot of various debris tossed around.

And here I put a coat of paint on.

The other two recessed parts are in. The top one fits inside the hole, so you might have to trim it to fit right. I also framed it with plastic strip.


So, what does the inside of a Sandcrawler look like? Besides the lower chamber, we really do not know, so it is up to the builder. I am going to go with the cutaway view and make a tread and such. Here are some views I found to get some ideas.


Ramp is done. There will be a little extension at the end.

Treads are done, yay! The center plates are a little off on the ends. Those top circular details should match up in the center of the sprockets, but they are a little low. Still, I think they look great, huge and heavy.


The weathering is very heavy. I think the Sandcrawler is the most weathered Star Wars vehicle in the movie. The paint went like this: First, the base coat. Then, a heavy wash of black. Then I used a wide, stiff brush in vertical strokes and put on a layer of Burnt Umber. You can use your fingers or a piece of paper towel to rub each layer in to blend. Then the same with black, a lighter brown, and finally a little light tan. Lastly, I dry brushed aluminum to bring out the details. The aluminum also makes it look like the paint wore off to the metal base. Then spray it all down with dull coat. There are many large pieces to the treads, so be prepared to take some time to get them all done.


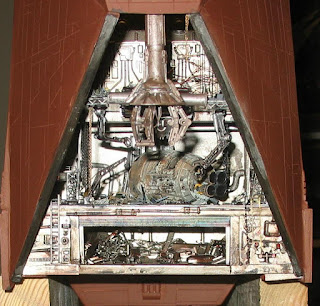
The inside of the Sandcrawler is complete. Here you can see the drop crane and various sections. Also some shots showing the conveyer belt. The escape pod is the DeAgostini Vehicles Diecast. I wanted to give the impression of an industrial look with debris scattered about. All it needs are some Jawas running around. Now, I can attach the top of the Sandcrawler and finish the base paint.


Repair time!
So, after looking at the unalignment of the plates, I made the decision to try and reposition those ends. Unfortunately, the plates are attached with epoxy and they are going nowhere, so I need to figure out how to remove just the circle ends. I needed something I can drill them out, so here is what I came up with.

I took a grinding jig and moved the end of the replaceable pad over the end of the main jig. This actually fit perfectly over those end pieces.
Here the pieces have been removed.
And here they are repositioned and installed. I was surprised how much I actually moved them. I used some plastic to fill in the space and then putty to fill in any gaps.

And then I repainted the ends and weathered them as before. I think they look much better, and I can sleep easier.

Painted the bridge and added some micro machine Jawas. You really won't be able to see much of this detail thru the windows, so I made sure to splash some color around. I think it is really great that the kit comes with a completely detailed bridge.

Before I can mount the bridge I have to paint the outside, so I went ahead and put a coat on. The top will still need to be glued and puttied into place, but a little paint really begins to bring the project together.


Bridge is installed. Here you can see a few Jawas peeking out.


Top is on and painted.


Here I am detailing some panels. These will be toned down quite a bit with the weathering.

First part of weathering is a heavy, black wash. This tones down the base paint and brings out some details.


For the weathering, I first did vertical brushing with Burnt Umber.

Then streaks with black.

Then a few streaks with a more chocolate brown.

And finally a light tan.

Lastly, I dry brushed aluminum on the raised details and corners.
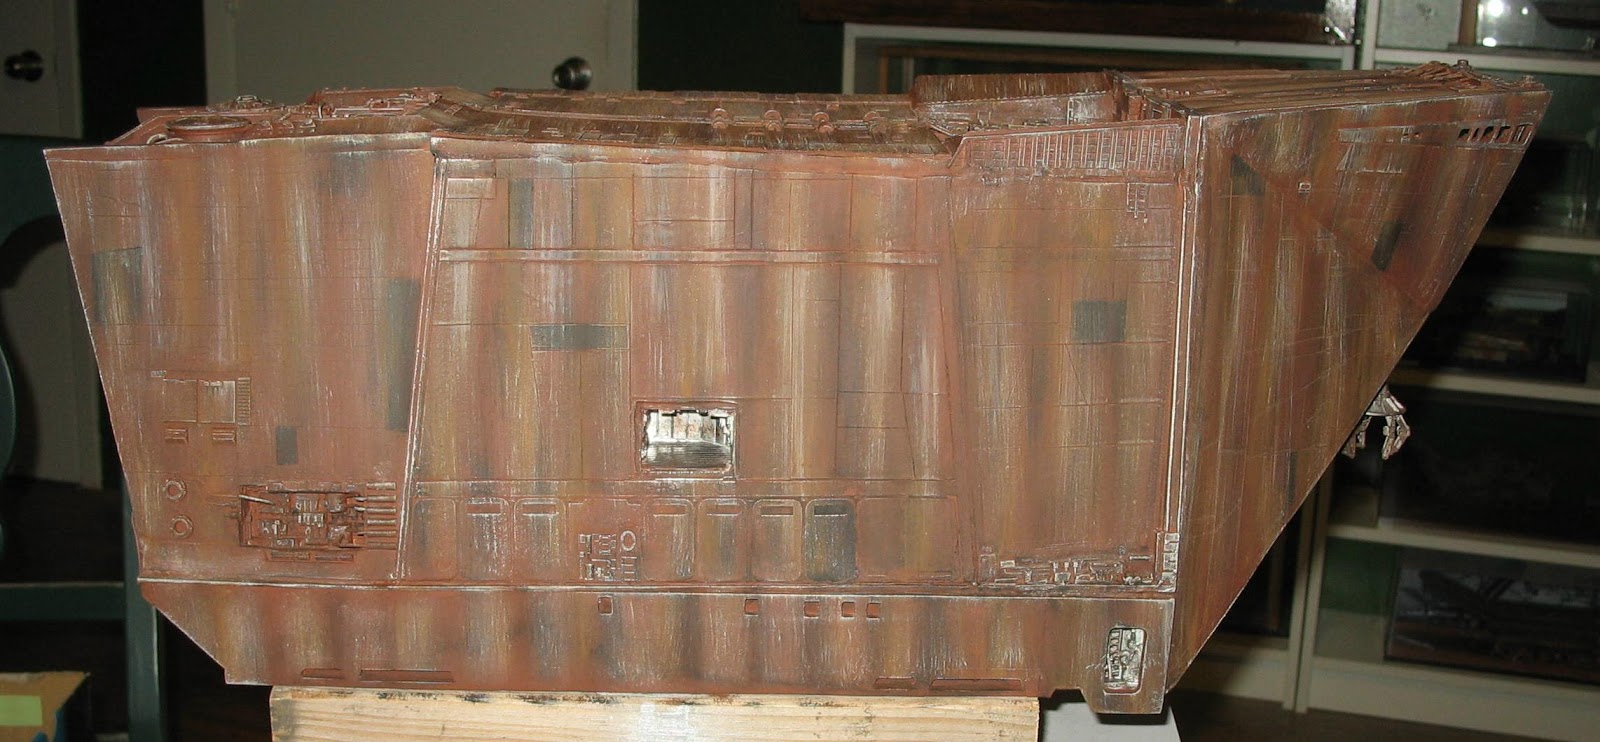


I have completed painting the weird pattern on the Sandcrawler. For the top, I used yellow at first, then an orange-yellow mix. I then went over it with Burnt Umber and wiped it off. For all the silver chipping I used a silver Sharpie pen.
The whole thing was hosed down with a couple coats of dullcoat then.


Treads are attached, and I did a little more detail painting. It's looking like a Sandcrawler now! Here is a pic of the kit without a flash so it looks more natural, and below is a picture of the movie prop for comparison. I think it is looking pretty decent.


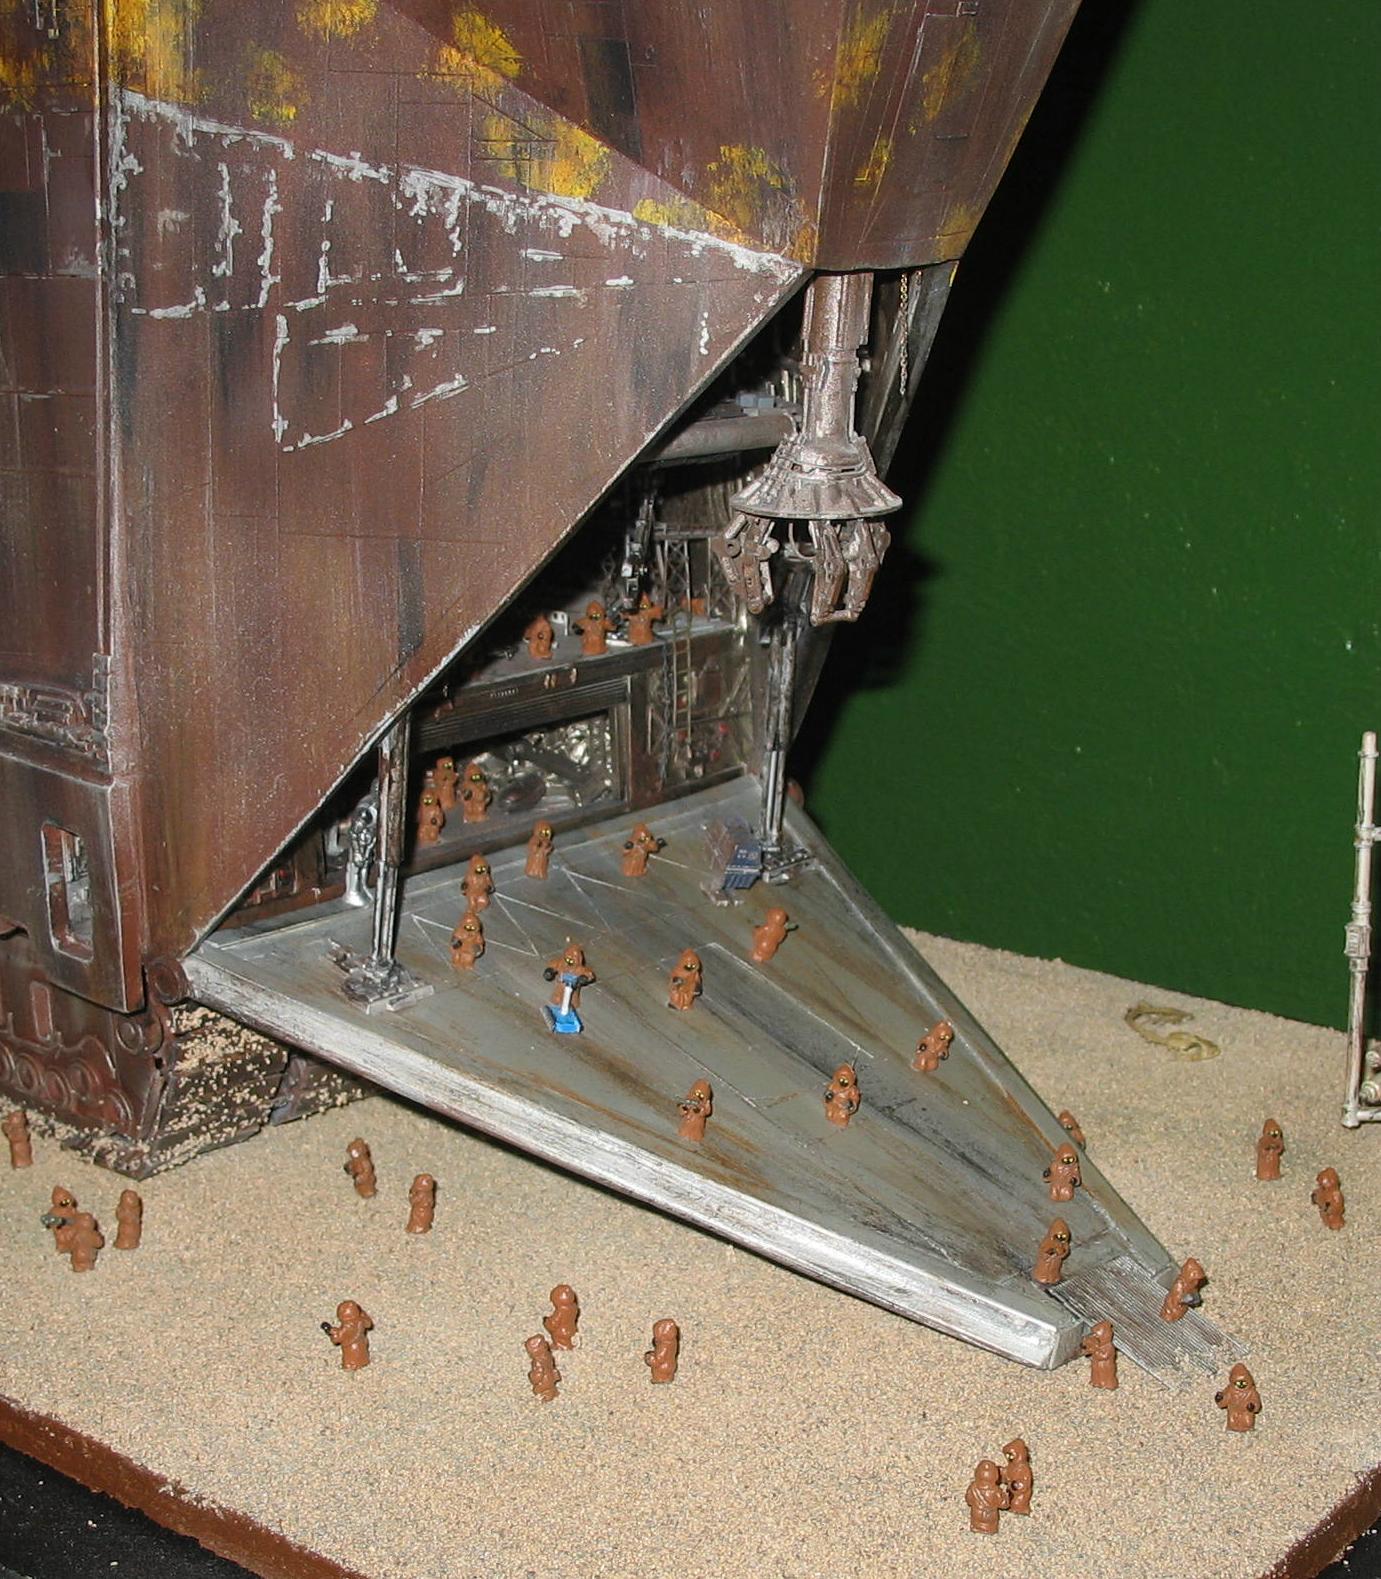
The Sandcrawler has been attached to the sand base I made and then I attached the ramp. Then I made some hydraulics for the ramp and finished the rest of the main build. At this point the Sandcrawler is complete. I will now work on the figures. There will also be a little crane coming out on the side.


I added a moisture vaporator. The vaporator came from this Luke Skywalker figure pack. All I did was weather it.


Here are the rest of the micro machine Jawas. I will modify most so they will look different. I have more than I thought!

For R2-D2 an R4-D4, I originally wanted to use micro machine ones. However, they were really out of scale, so I thought I would just make a couple. For the bases I made them out of some wood dowel. The I painted them and printed out some decals for the body. The arms and feet were carved from plastic.

The droids in front of the Sandcrawler are: 2X-7KPR, R1-G4, WED-15-ST68, R2-D2, C-3P0, R5-D4, and LIN-V8K. Most will be scratchbuilt. The R1-G4 and LIN-V8K, and C-3P0 are modified micro machines.

Ok, the droids are done!

And here are some repaint micro machines that I will use in the Sandcrawler interior. The WED Treadwell is scratch built.

Here is Luke and Uncle Owen. I carved up and puttied a couple micro machine figures to make them.

Finally found a home for this lizard skeleton I found one time.

I came across this eel figure, I think it came from some Ariel Disney set and knew I had to use him. I grinded down his eyes and did a repaint.

There are many dangers in the sands of Tatooine.

Done!


Finishing the project, I built a case to keep off the dust. A sheet of Plexiglas was cut on a table saw, taped together, and then sealed with clear caulk.

A couple strips of angle trim was then cut and attached, and the case is complete.

fantastic build - I'm building one of these at the moment and had not seen your build until now - funnily enough, a lot of the add-lib that you included is also being made by me - including the MM jawas which cost me a small fortune - fantastic diorama there
ReplyDeleteThanks for the kind words, it was a fun build and looks impressive when all complete. Best of luck in yours!
DeleteI high appreciate this post. It’s hard to find the good from the bad sometimes, but I think you’ve nailed it! would you mind updating your blog with more information? resin driveways
ReplyDelete